I’m really pleased that my painting, “Walking the dog” has been accepted for the RBSA (Royal Birmingham Society of Artists) Exhibition 2020.
I’m very happy that “Walking the dog” has now been sold.
https://www.rbsa.org.uk/rbsa-prize-2020
Artist – based in the West Midlands
I’m really pleased that my painting, “Walking the dog” has been accepted for the RBSA (Royal Birmingham Society of Artists) Exhibition 2020.
I’m very happy that “Walking the dog” has now been sold.
https://www.rbsa.org.uk/rbsa-prize-2020
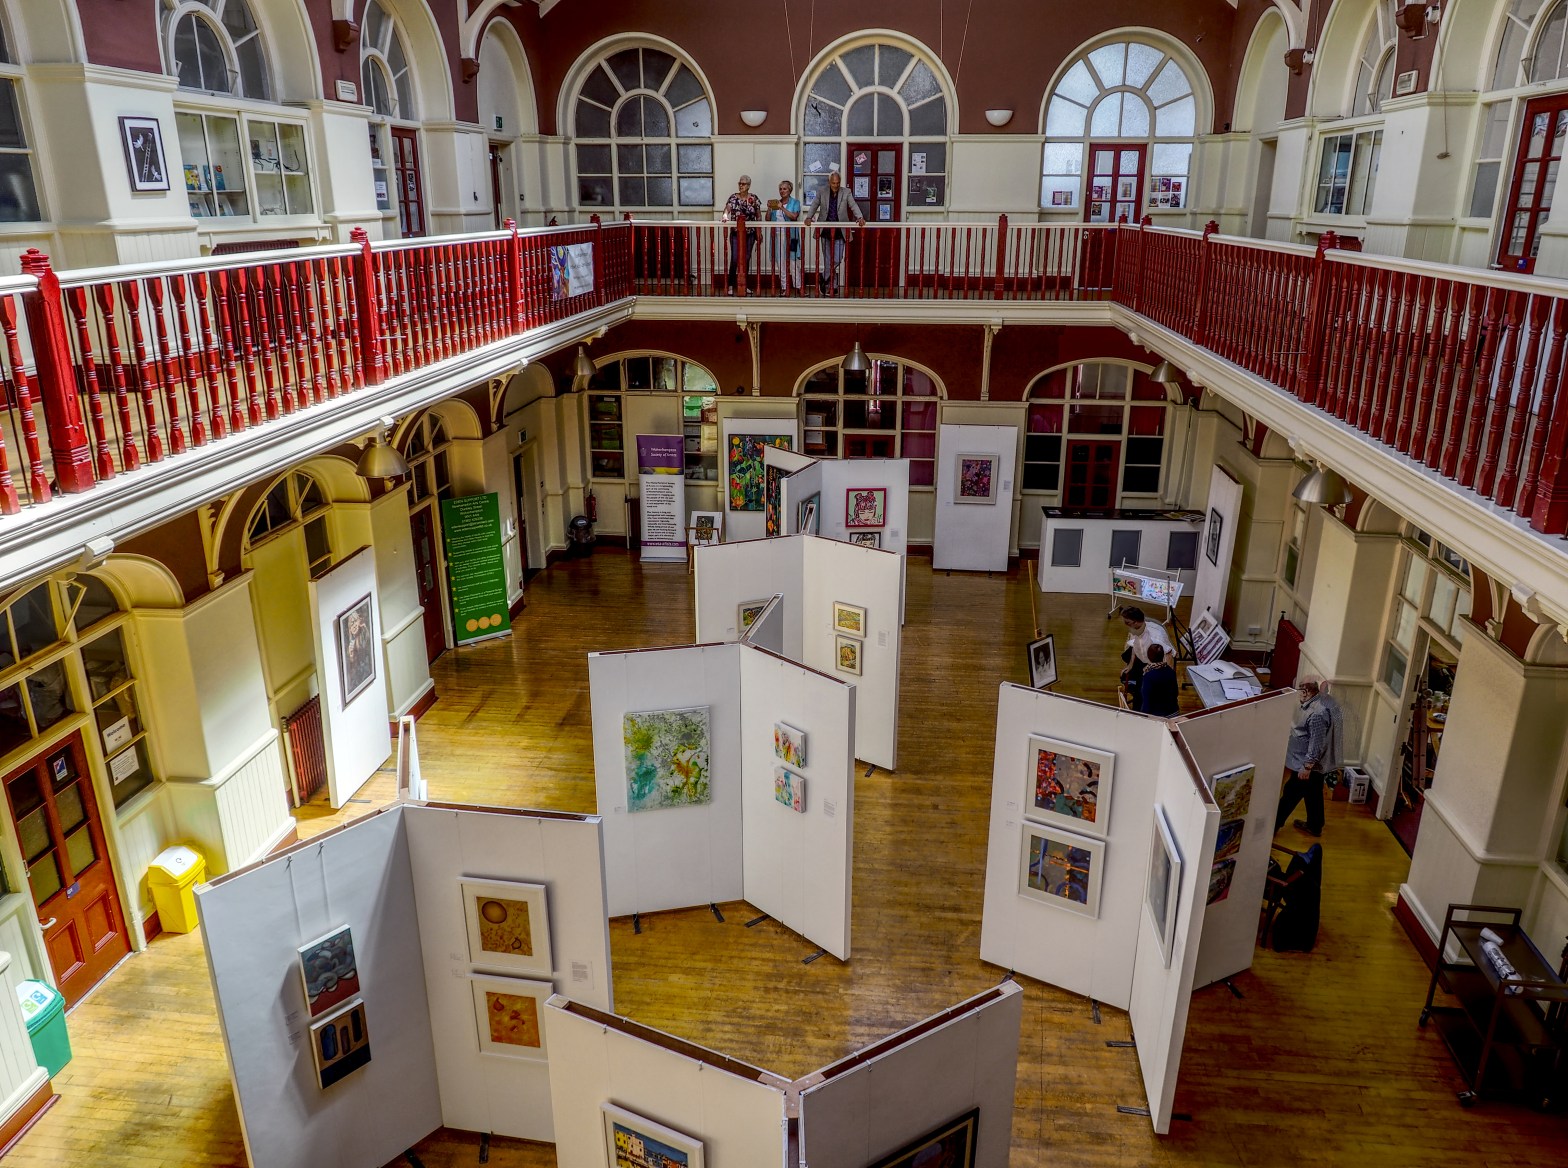
Following the periods of COVID lockdown I thought it would be a Good Idea to organise an exhibition to encourage people to celebrate the return the much missed social space and to encourage people to show so in August 2022 I organised a small exhibition in Newhampton Arts Centre (the NAC) in Dunkley Street, Wolverhampton. It was cheap and cheerful and open to the first fifteen or so artists I could persuade to cough up the minimum necessary to hire the gallery.
In the event it was a successful exhibition. It didn’t sell very much, but it was generally well attended with positive responses from everyone who visited.
Two things came out of the exhibition: the first was that there are many people who love to paint and draw but who typically don’t think of themselves as artists and don’t consider exhibiting their work.
In the meantime, two friends who had studios in the NAC, Chris Manley and Paul Owen set up a Community Interest Company, a not for profit organisation to make the creation and exhibition of art available to everyone. They made their studios available for classes and workgroups and set up a bereavement arts group . Chris Manley had already been doing significant work with Good Shepherd, who work with homeless people and provide a food bank.
We decided to organise an exhibition which would be open to all comers. Art 4 All was launched by the City Mayor on 24th March 2023 and has been a resounding success with 93 exhibitors showing 281 pieces of work, 960 visitors visitors and the sale of 27 works. It also included a talk by Ukrainian artist Tatiana Z of Mariupol, reflecting her experience of surviving the attack on the city, its subsequent destruction and her ultimate escape to the UK.

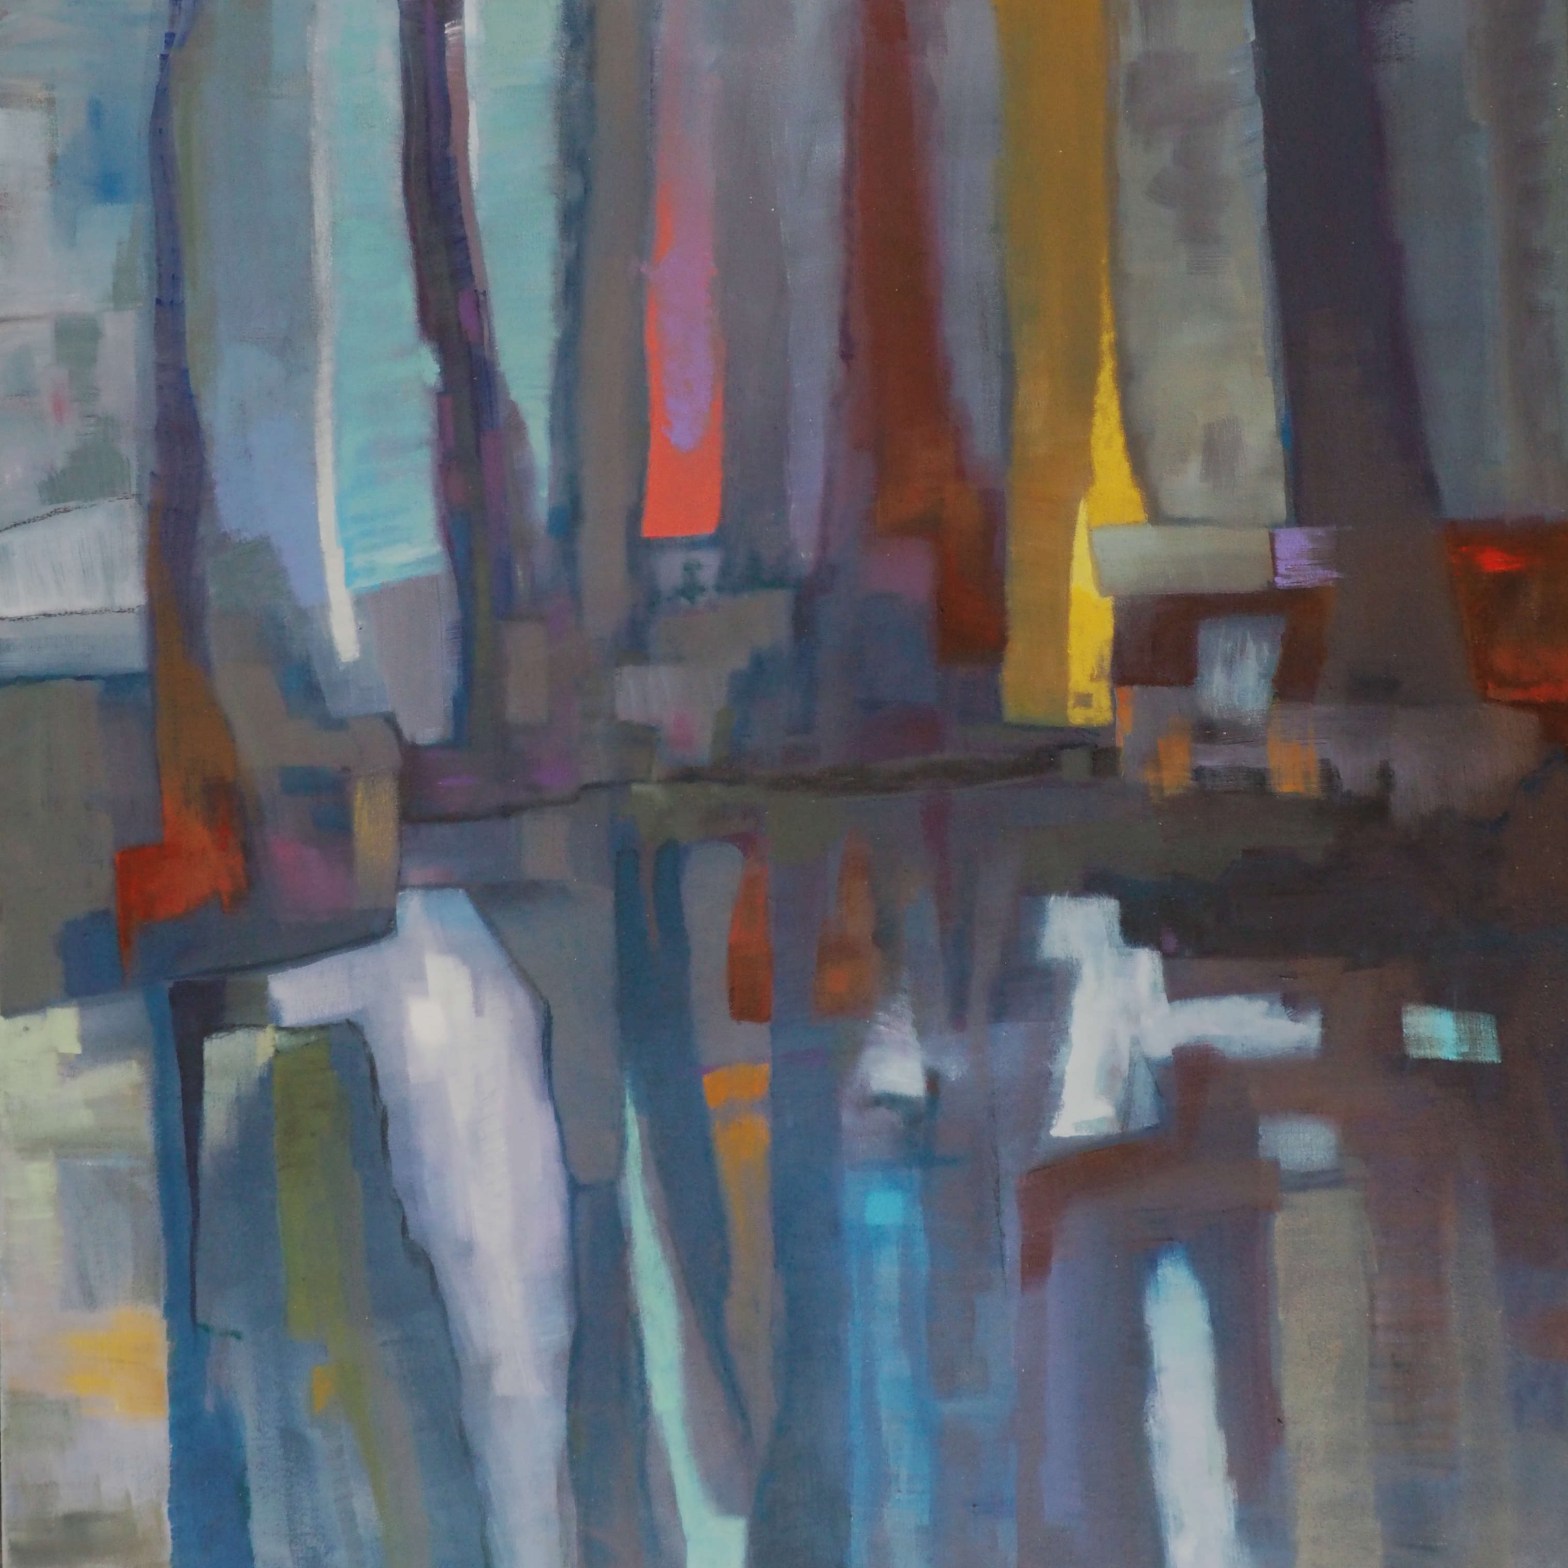
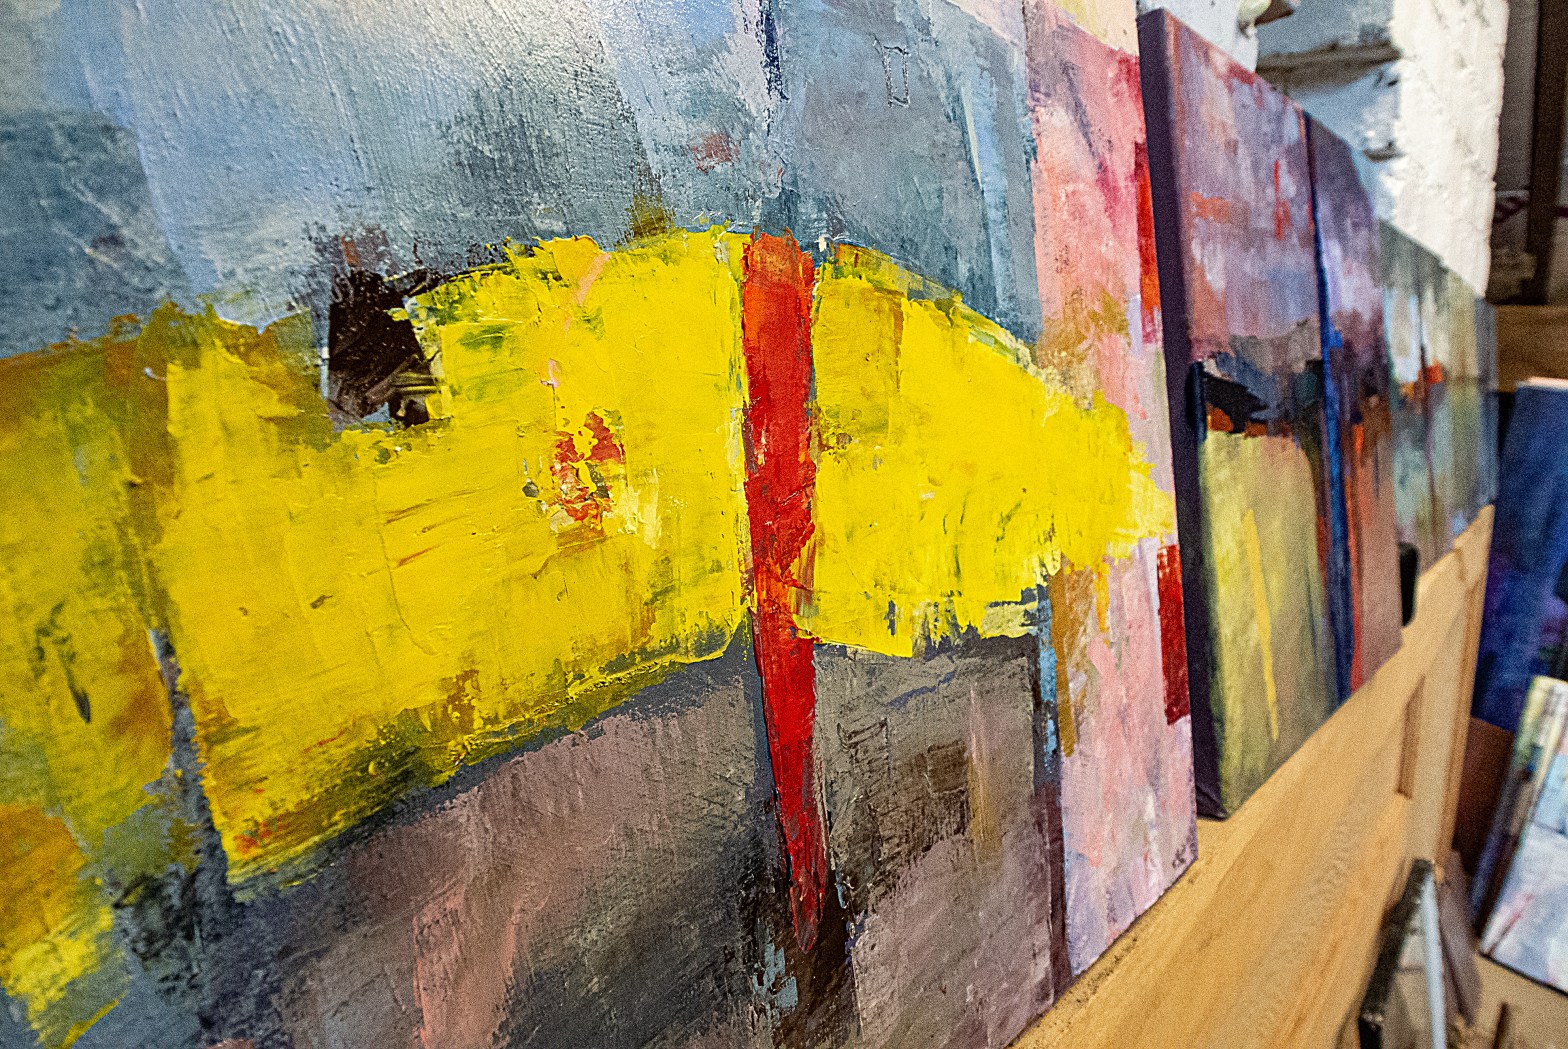
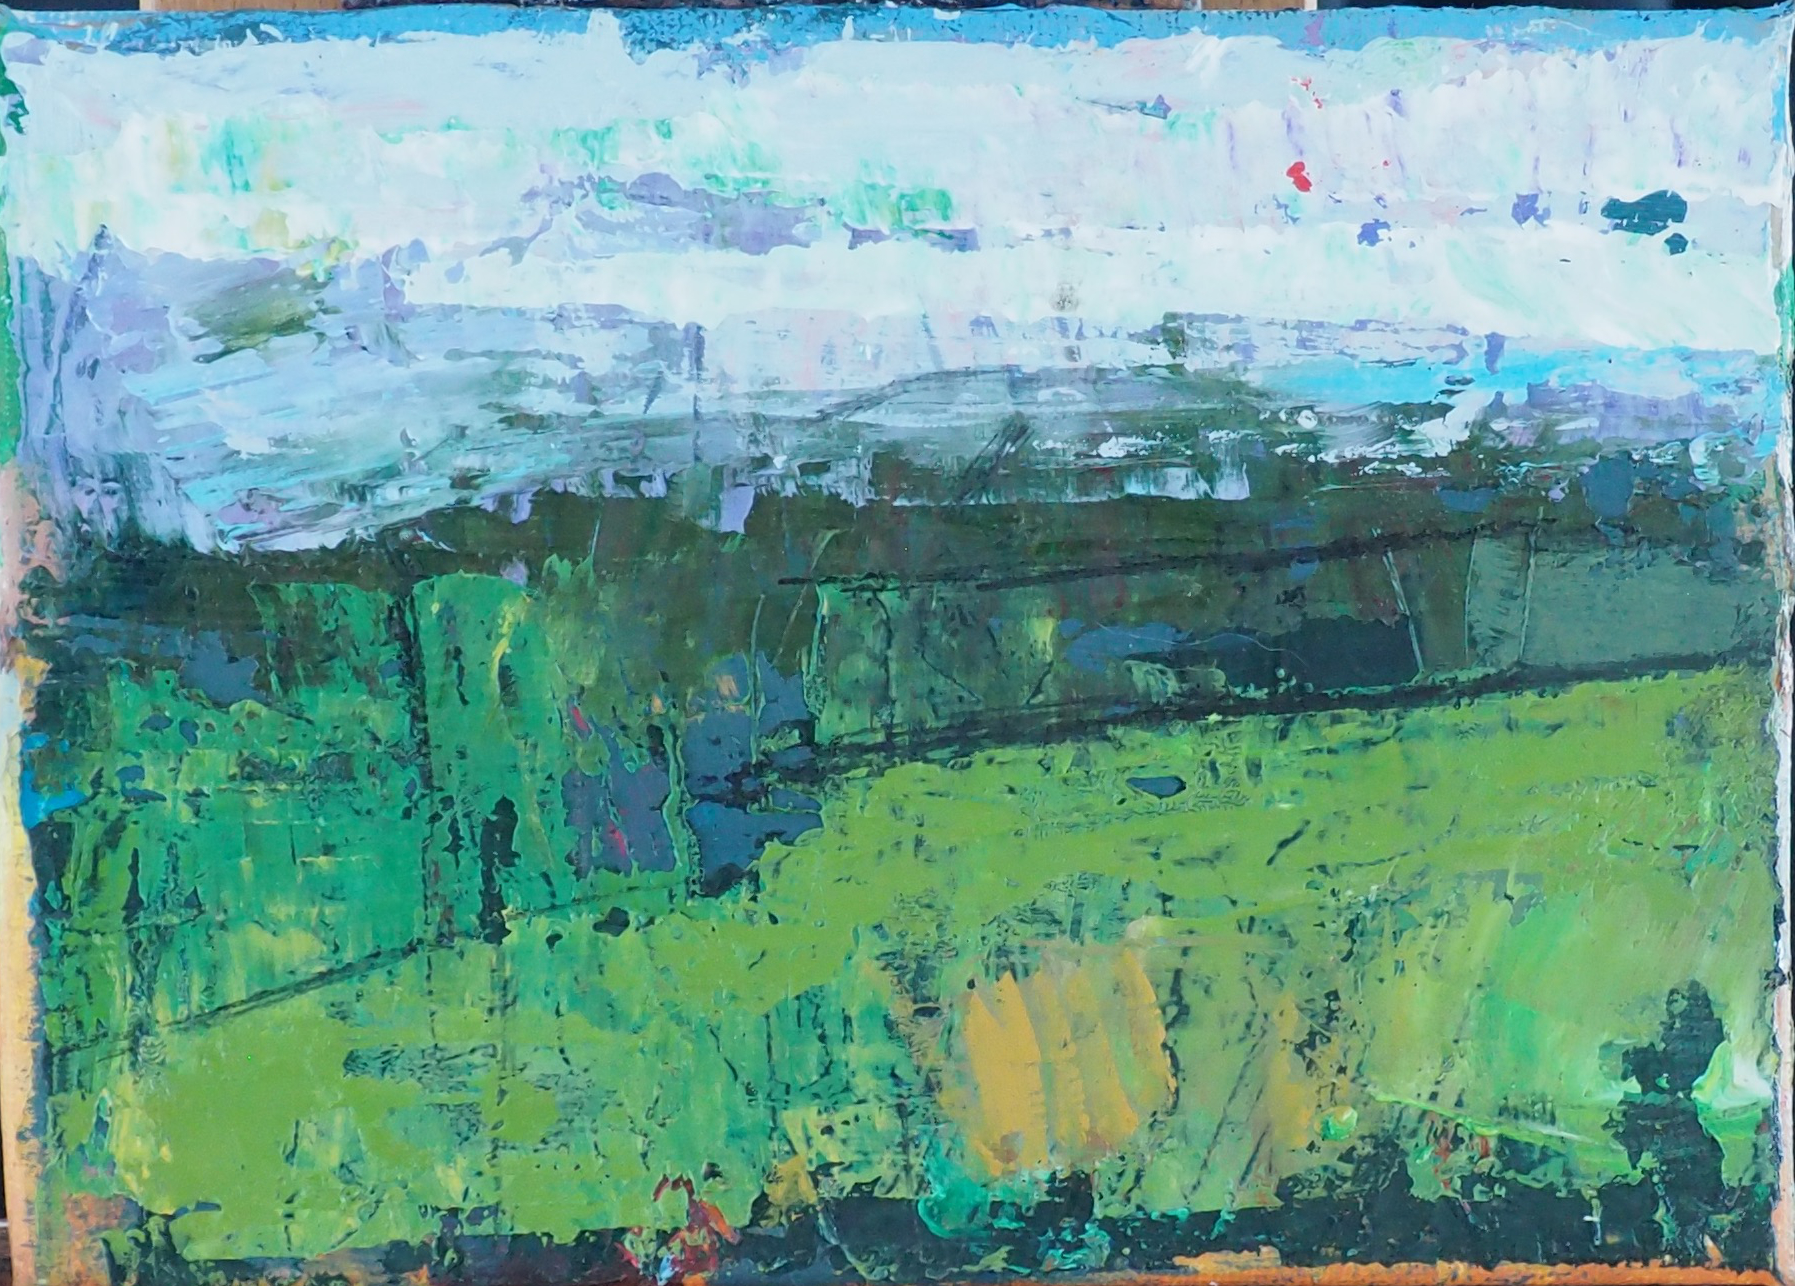
This is a new departure. I.m working larger than hitherto, and layering.
This post supports and amplifies notes given out at my canvas stretching demo on canvas stretching at Wolverhampton Art Gallery 26th November 2022.
Stretching your own
Why would you stretch your own canvas? The obvious reason is cost. Good quality stretched canvases are expensive. There are poorer quality canvases available from hobby shops, and you get what you pay for. You may also require a size or a type of canvas that is not available ready made. If you do a lot of canvas painting, buying quantities of stretch bars and canvas can be a cost effective option and once you’re set up, as you gain experience, the process becomes straightforward.
Things to consider
To begin with, you need to decide what size your painting will be and possibly whether you will be exhibiting it or producing it for a commission or for a particular setting. These decisions may affect the canvas and stretcher bars you need to purchase. You can also make your own stretcher bars, but that is outside the scope of these notes: my experience is that stretcher bars can be purchased relatively cheaply and are of a quality which would be difficult to improve on without significant additional expenditure on tools and equipment. If you buy stretchers, ask if they come with wedges, also called ‘keys’ for tightening the stretchers post-stretching, if not you may need to buy these separately.
What you will need
Stretcher bars to size
Canvas
Tape measure
Straightedge or ruler, preferably metal.
Strong scissors
Small hammer and a block of wood or soft-faced mallet
Heavy duty stapler and staples
Canvas pliers (optional).
Choosing stretcher bars
You can buy stretcher bars from most good art suppliers and I’ve added a non-exhaustive list below. Stretcher bars vary in quality and dimensions and suppliers will usually provide detailed information, but when you’re stretching a canvas you really need to know the depth and thickness of the bars you’re using as these dimensions will affect how much canvas you use.
Decide if you want to use one of more cross bars in the stretcher. Stretching a canvas puts strain on the stretcher and can cause it to warp so that when the finished painting is hung, all four corners are not on the wall. If the painting is to be framed, the frame will add stiffness but it’s not designed to hold the stretcher flat. If you use a single cross bar on a rectangular stretcher, it should go across the width, not along the length of the stretcher. It’s also important to keep the tension even when you’re stretching the canvas.
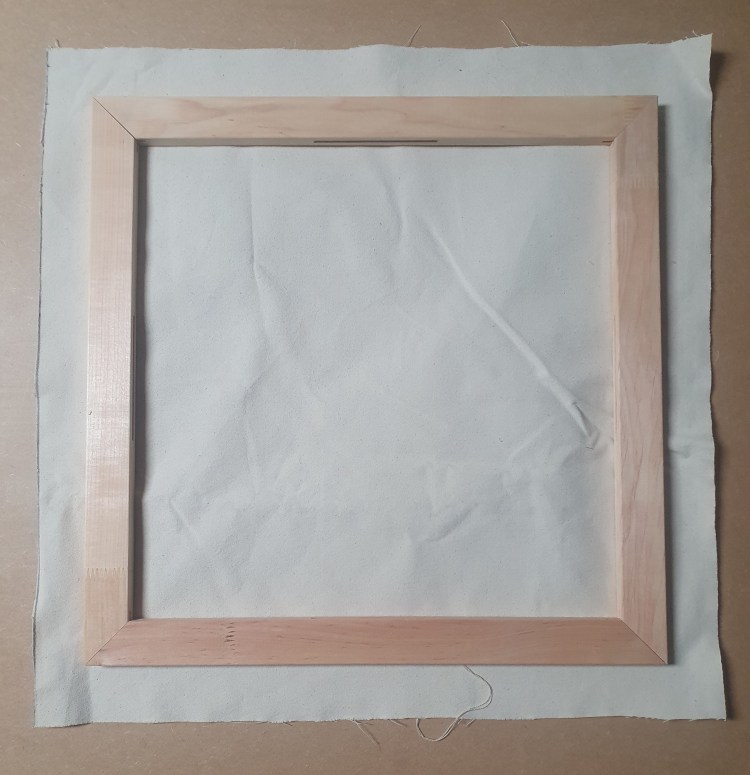
Constructing the stretcher
You’ll need four stretcher bars of the desired length plus cross-bars if you’re using them. You’ll see that each stretcher bar has a mitre joint at each and and a bevel or a raised edge on one face. It should be fairly obvious haw these go together. The things to remember are that the corners of the stretcher need to all be at right angles, all the joints need to be tight and the bevel or raised edge on the bars need to all be on the same side. Place the first stretcher bar, usually one of the long sides, on the work surface and construct each corner of the stretcher. The joints should be tight, but not too tight to put together by hand initially. You will probably then have to tap them home with a soft-faced mallet or a small hammer and a block of wood. Don’t use a hammer directly on the stretcher. It shouldn’t be necessary and it may damage the stretcher bars. You should also have eight small keys (wedges). These are for tightening the stretcher and you don’t need them at this stage. Don’t be tempted to use glue, the corners of the stretcher need to be able to move and in any case the canvas will hold the joints firmly together. Check the corners are all 90º by measuring across the diagonals of the stretcher. If both diagonals are exactly the same length then the stretcher is square.
Canvas
A detailed description of canvas and how to us it is outside the scope of these notes, but you can get full information from suppliers. In general you will need to take into account:
For starting out, a typical canvas for a small stretcher would be 8 or 10oz cotton duck.
Stretching the canvas
You will need to work on a solid, clean, flat work surface. When measuring and cutting the canvas, don’t make the piece you use less than the size of the stretcher plus 2 times the width plus the thickness of the stretcher bars in each direction, e.g. if the stretcher you’re using is 500 x 500mm and the stretcher bars you’re using are 11mm thick and 40mm wide, then the minimum canvas you’ll need is 500 + 2(11+40)mm or 602mm in each direction. In general you will be adding 4 to 6 inches of canvas in each direction to the finished size of the stretcher. Don’t overdo it. You can have too much canvas which adds nothing to the strength of the stretched canvas and looks unsightly. It also gets in the way when you’re doing the stretching.
Ensure that all cuts are parallel to the weave of the canvas. If possible, take your measurements starting from the machined edge of the canvas, carefully marking with a soft pencil on the canvas the edges to be cut and the position of the edges and corners of the stretcher. You can do this using the stretcher itself and a straightedge. Any pencil marks will be hidden by the stretching process.
Lay the stretcher face down on the centre of the canvas, ensuring that there is an equal amount of canvas on each side of the stretcher. This should be at least the thickness plus the width of the stretcher bar on each side.
The key to stretching canvas is to maintain even tension and to work from the centre. Working from the centre of each stretcher bar, staple the canvas at regular (about 40mm centre) intervals towards each corner of the stretcher. At this stage you can use canvas pliers, but note that it is possible to overstretch canvas. If the stretcher you’re making is rectangular, start by placing a staple in the centre of the canvas along one of the long sides. Continue with a staple in the centre of the opposite side, then do the same thing with the two remaining sides.
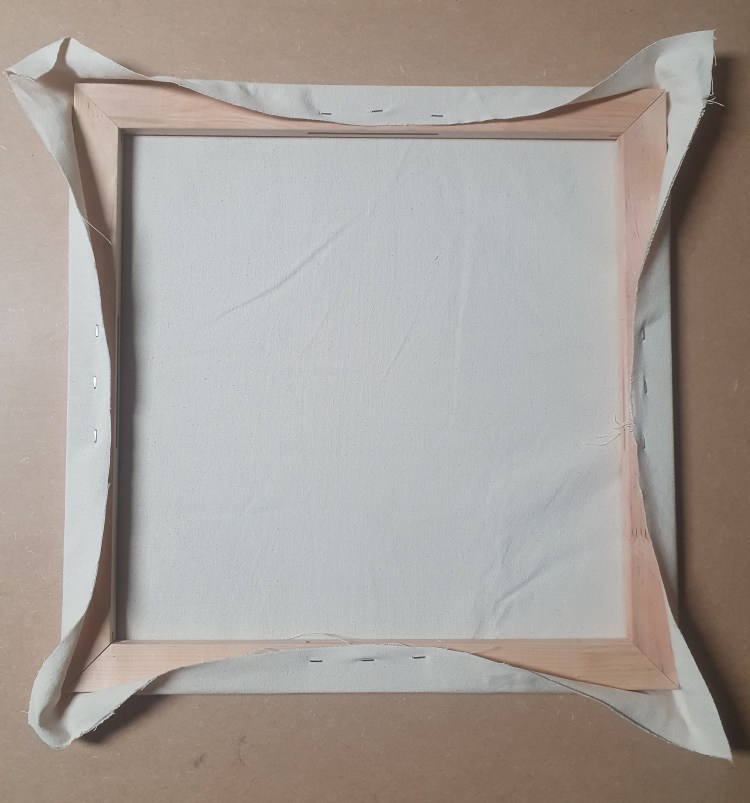
Keeping to the same order, place staples on each side working towards each corner before placing each staple, pull the canvas out in the direction of stapling to remove any wrinkles or creases in the canvas and to increase the overall stretch on the canvas. This is quite important and it’s easier to do than to describe.
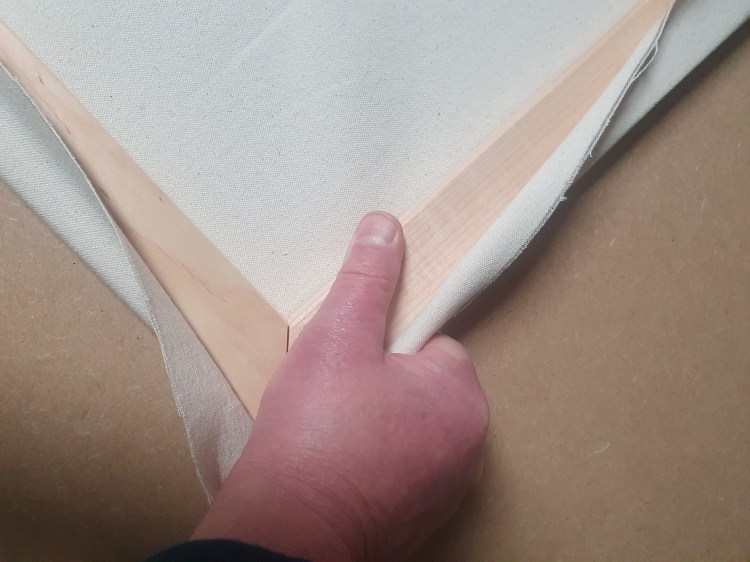
Corners
This takes practice. Fold the canvas at 45º holding it against the stretcher bar with your thumb. Now fold the canvas up and over the corner of the stretcher, creasing it with your fingers and folding it so that it’s even at the edge of the stretcher bar. Place staples in each edge of the corner as shown. Don’t staple across the stretcher joint as this needs to be able to move.
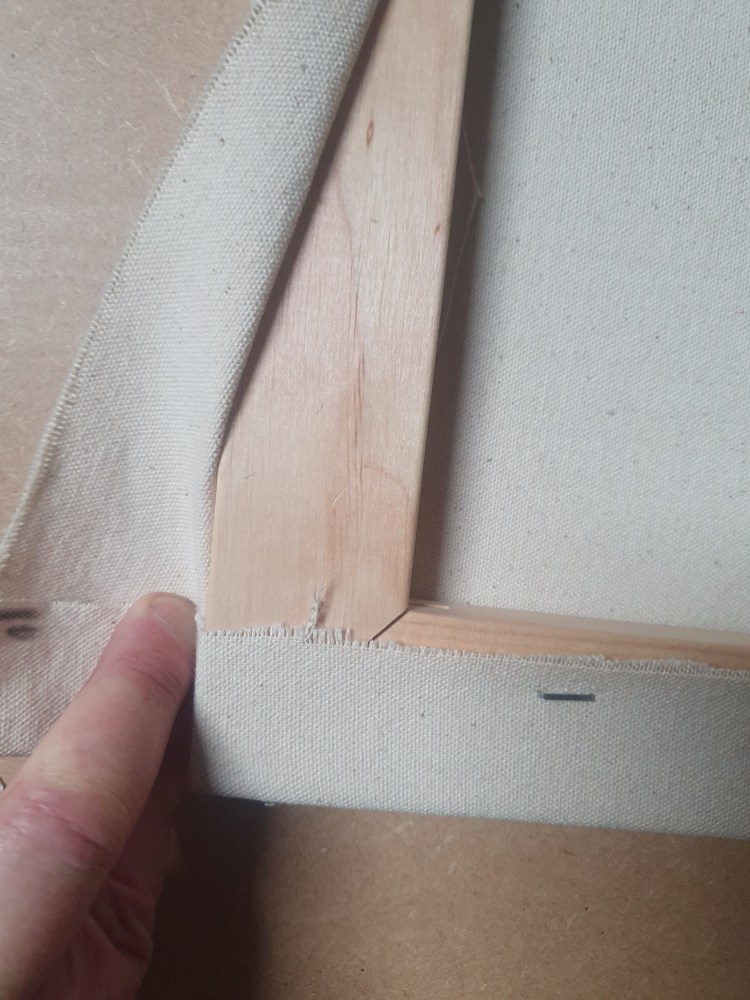
Firmly hold the canvas down at each corner ensuring tension at the corner and checking that there are no dimples on the face of the canvas.

Fold the canvas back at 45º.
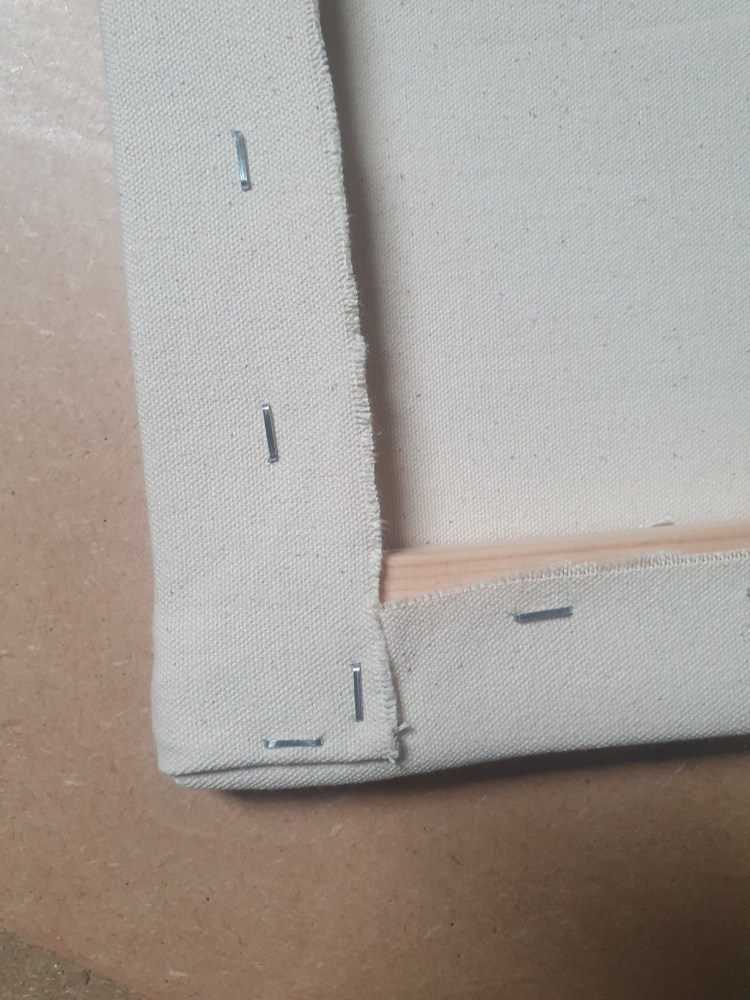
Fold the corner of the canvas over so that the edge is even with the edge of the stretcher.
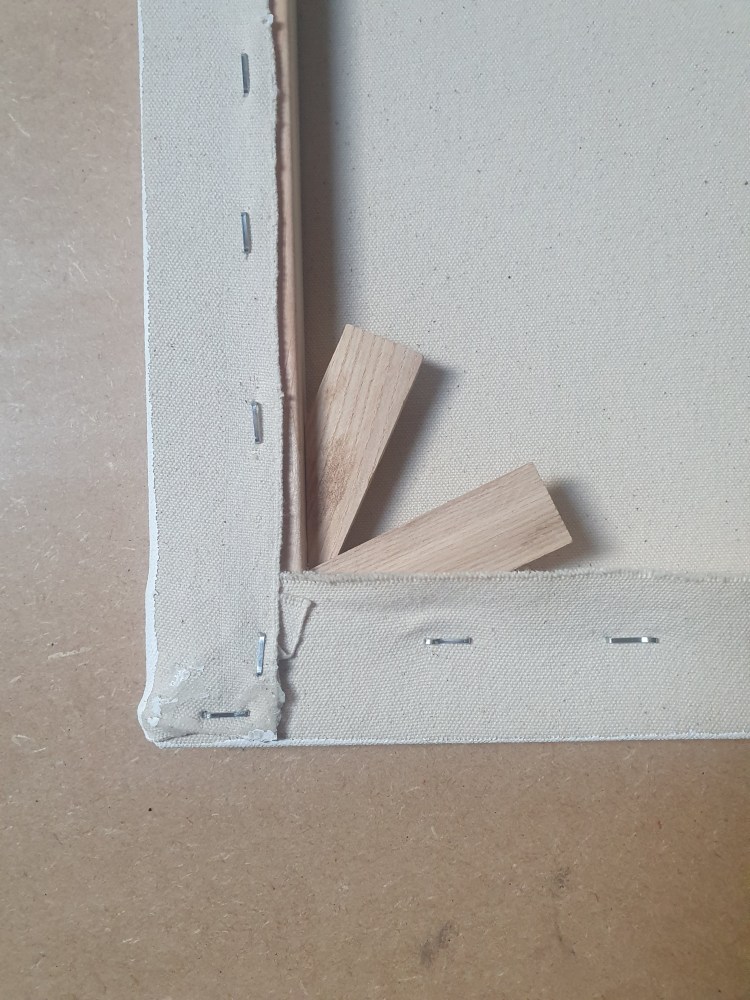
After stretching
You should have eight keys that were supplied with the stretcher bars. I generally add these now, but don’t put them in tightly as they will be used to adjust the tightness of the canvas later.
Priming
These notes concern canvas stretching, and priming may or may not be the next operation, depending on what you want to do. I generally prime canvasses with two coats of PVA or a coat of PVA and one of gesso. Others have their own approaches. If I’m using PVA I prefer to dampen the canvas prior to the first coat of priming as this helps the canvas to absorb the primer and makes it easier to apply as the water causes the canvas to shrink slightly.
When the canvas is stretched and primed, if you tap flick the surface with your finger, it should produce a solid drumming sound.
Suppliers
Google is your friend here. Canvas and stretcher bars are available via eBay, as are ready made stretchers of various sizes and quality. Canvas and stretcher bars can also be purchased from art suppliers. At present I get my canvas from the University shop in Wolverhampton, but this will be closed down Christmas 2022. I get stretcher bars from Picture Master, Aston, Birmingham https://www.picturemaster.uk/ .
Other suppliers include:
Lion framing supplies: https://www.lionpic.co.uk/
Jacksons: https://www.jacksonsart.com
Canvas Supplies: https://canvas-supplies.co.uk/
Bird and Davis: https://birdanddavis.com
Canvas and stretcher bars:https://www.canvasandstretcherbars.co.uk
Great art: https://www.greatart.co.uk
I hope the notes above have been useful. If you have any questions or comments, please email me at ralph.aldhous@outlook.com
I was lucky to join the Wolverhampton Society of Artists during their centenary year. If I hadn’t done so, I would probably still be storing my paintings in the attic. As it is, I’ve met many helpful and friendly people who have helped me no end in developing my work and exhibiting my paintings.
In December 2019, two of my paintings, “Don’t mess with Mother” and “Walking the dog”, were accepted for inclusion in the Wolverhampton Society of Artists Centenary Exhibition.

Facebook Wolverhampton Society of Artists
What’s On – Wolverhampton Society of Artists Centenary Exhibition.
I’ve always painted and drawn and it seems an entirely natural thing to do. I paint in oils and acrylic handle entirely differently and require different techniques. Both mediums allow infinite variation.
I love the way you can use paint which is transparent, highly textured, or anything in between to utilise a full range of the deepest and most subtle colour. Painting is about what you can do with paint and I do it for its own sake.
I would say my methods are traditional. I paint in oils on canvas using my fingers, palette knives, brushes and any other suitable instrument. I paint in acrylic on board and paper. I also draw from life which gives me underpinning skills that I use in painting.
I’m drawn to abstraction, but my work is rarely totally abstract or representational. It usually lives somewhere between and I like that people can take their own meaning from it.
Our reality is mind made and all abstract images are to some extent evocative of image. All representations carry a significant degree of abstraction: (“Ceci n’est pas une pipe”). There is a story I like about Picasso: A man approached the artist and said that the trouble with him was that he didn’t paint things as they are. Picasso replied that he didn’t know what that would be like. The man got irate and produced a photograph of his from his wallet and said, “There, you see, that is a picture of how my wife really is.” Picasso looked at it and said, “Really Monsieur? She is rather small and grey and flat isn’t she?
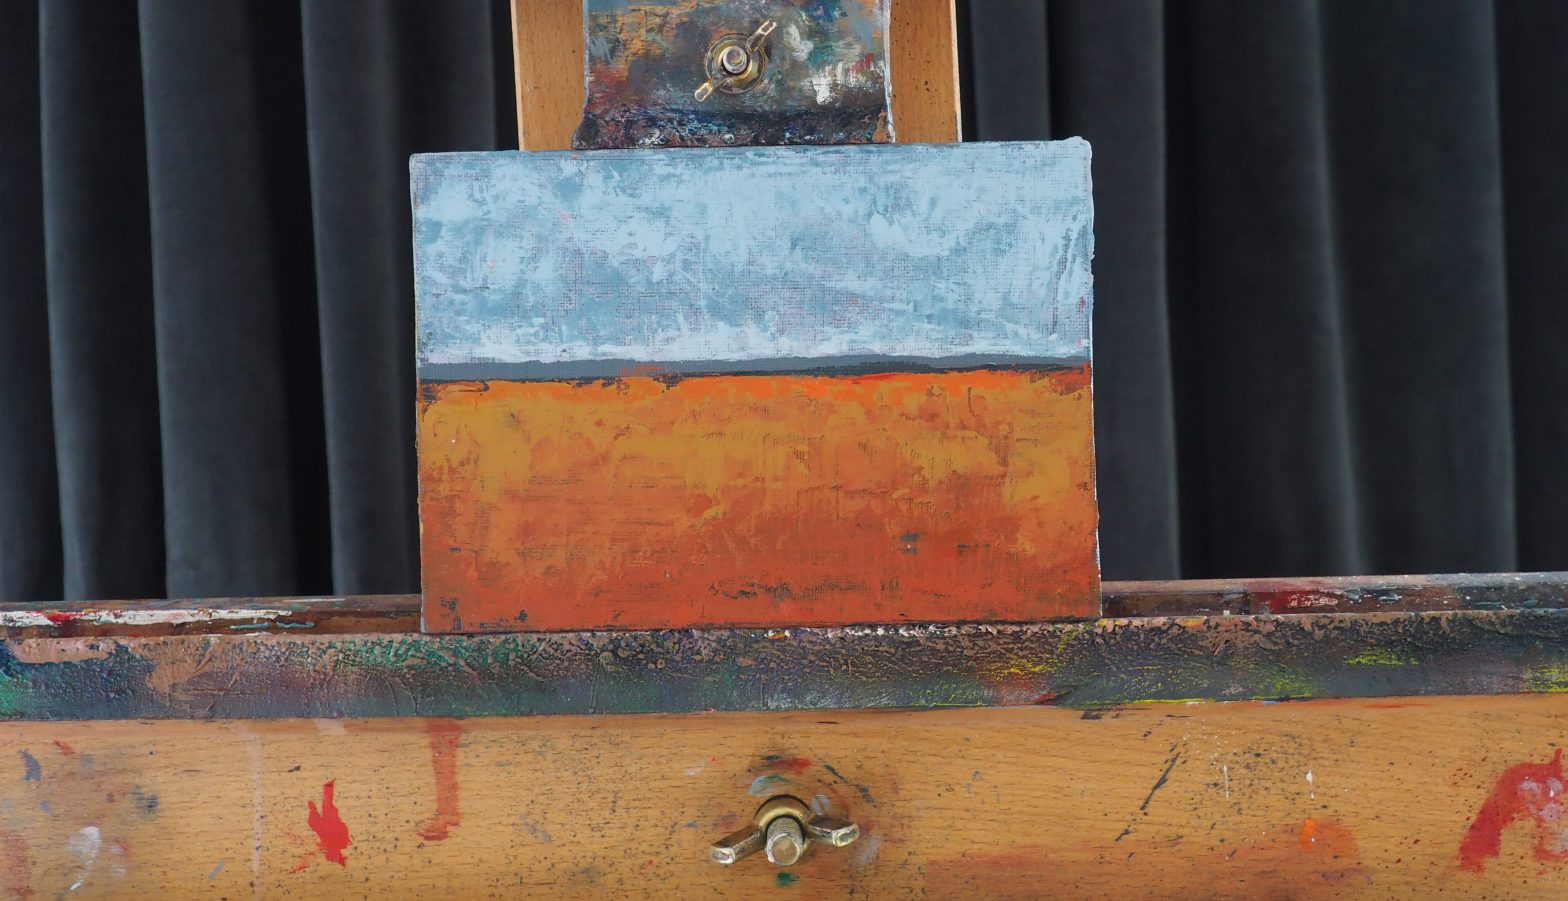
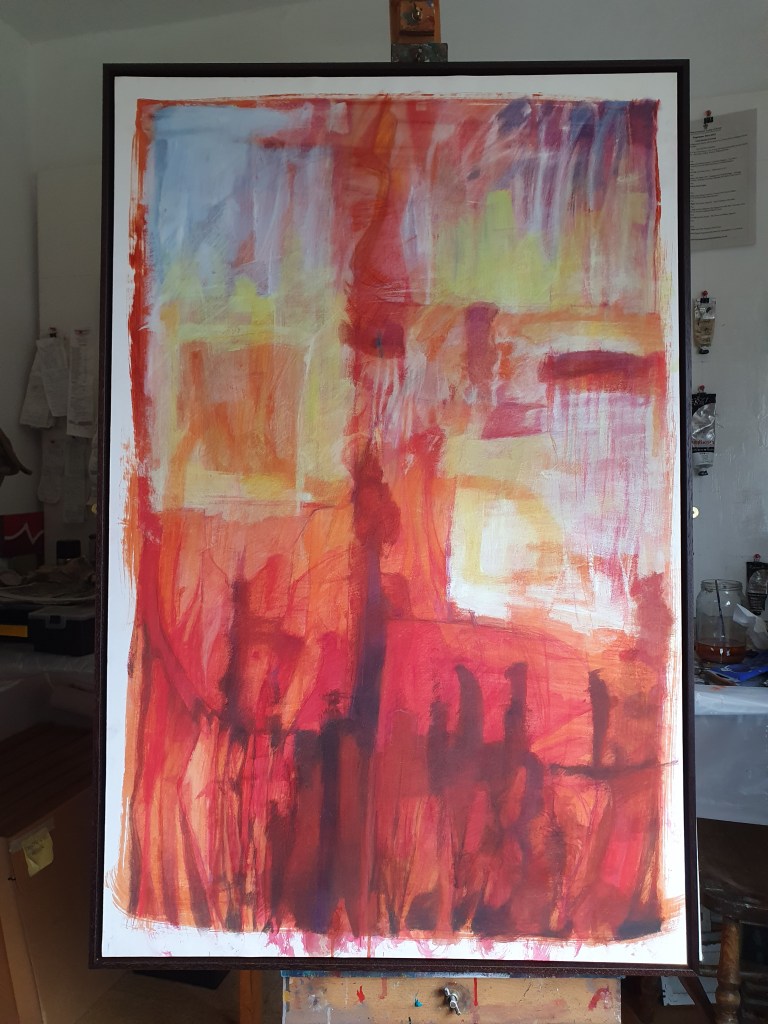
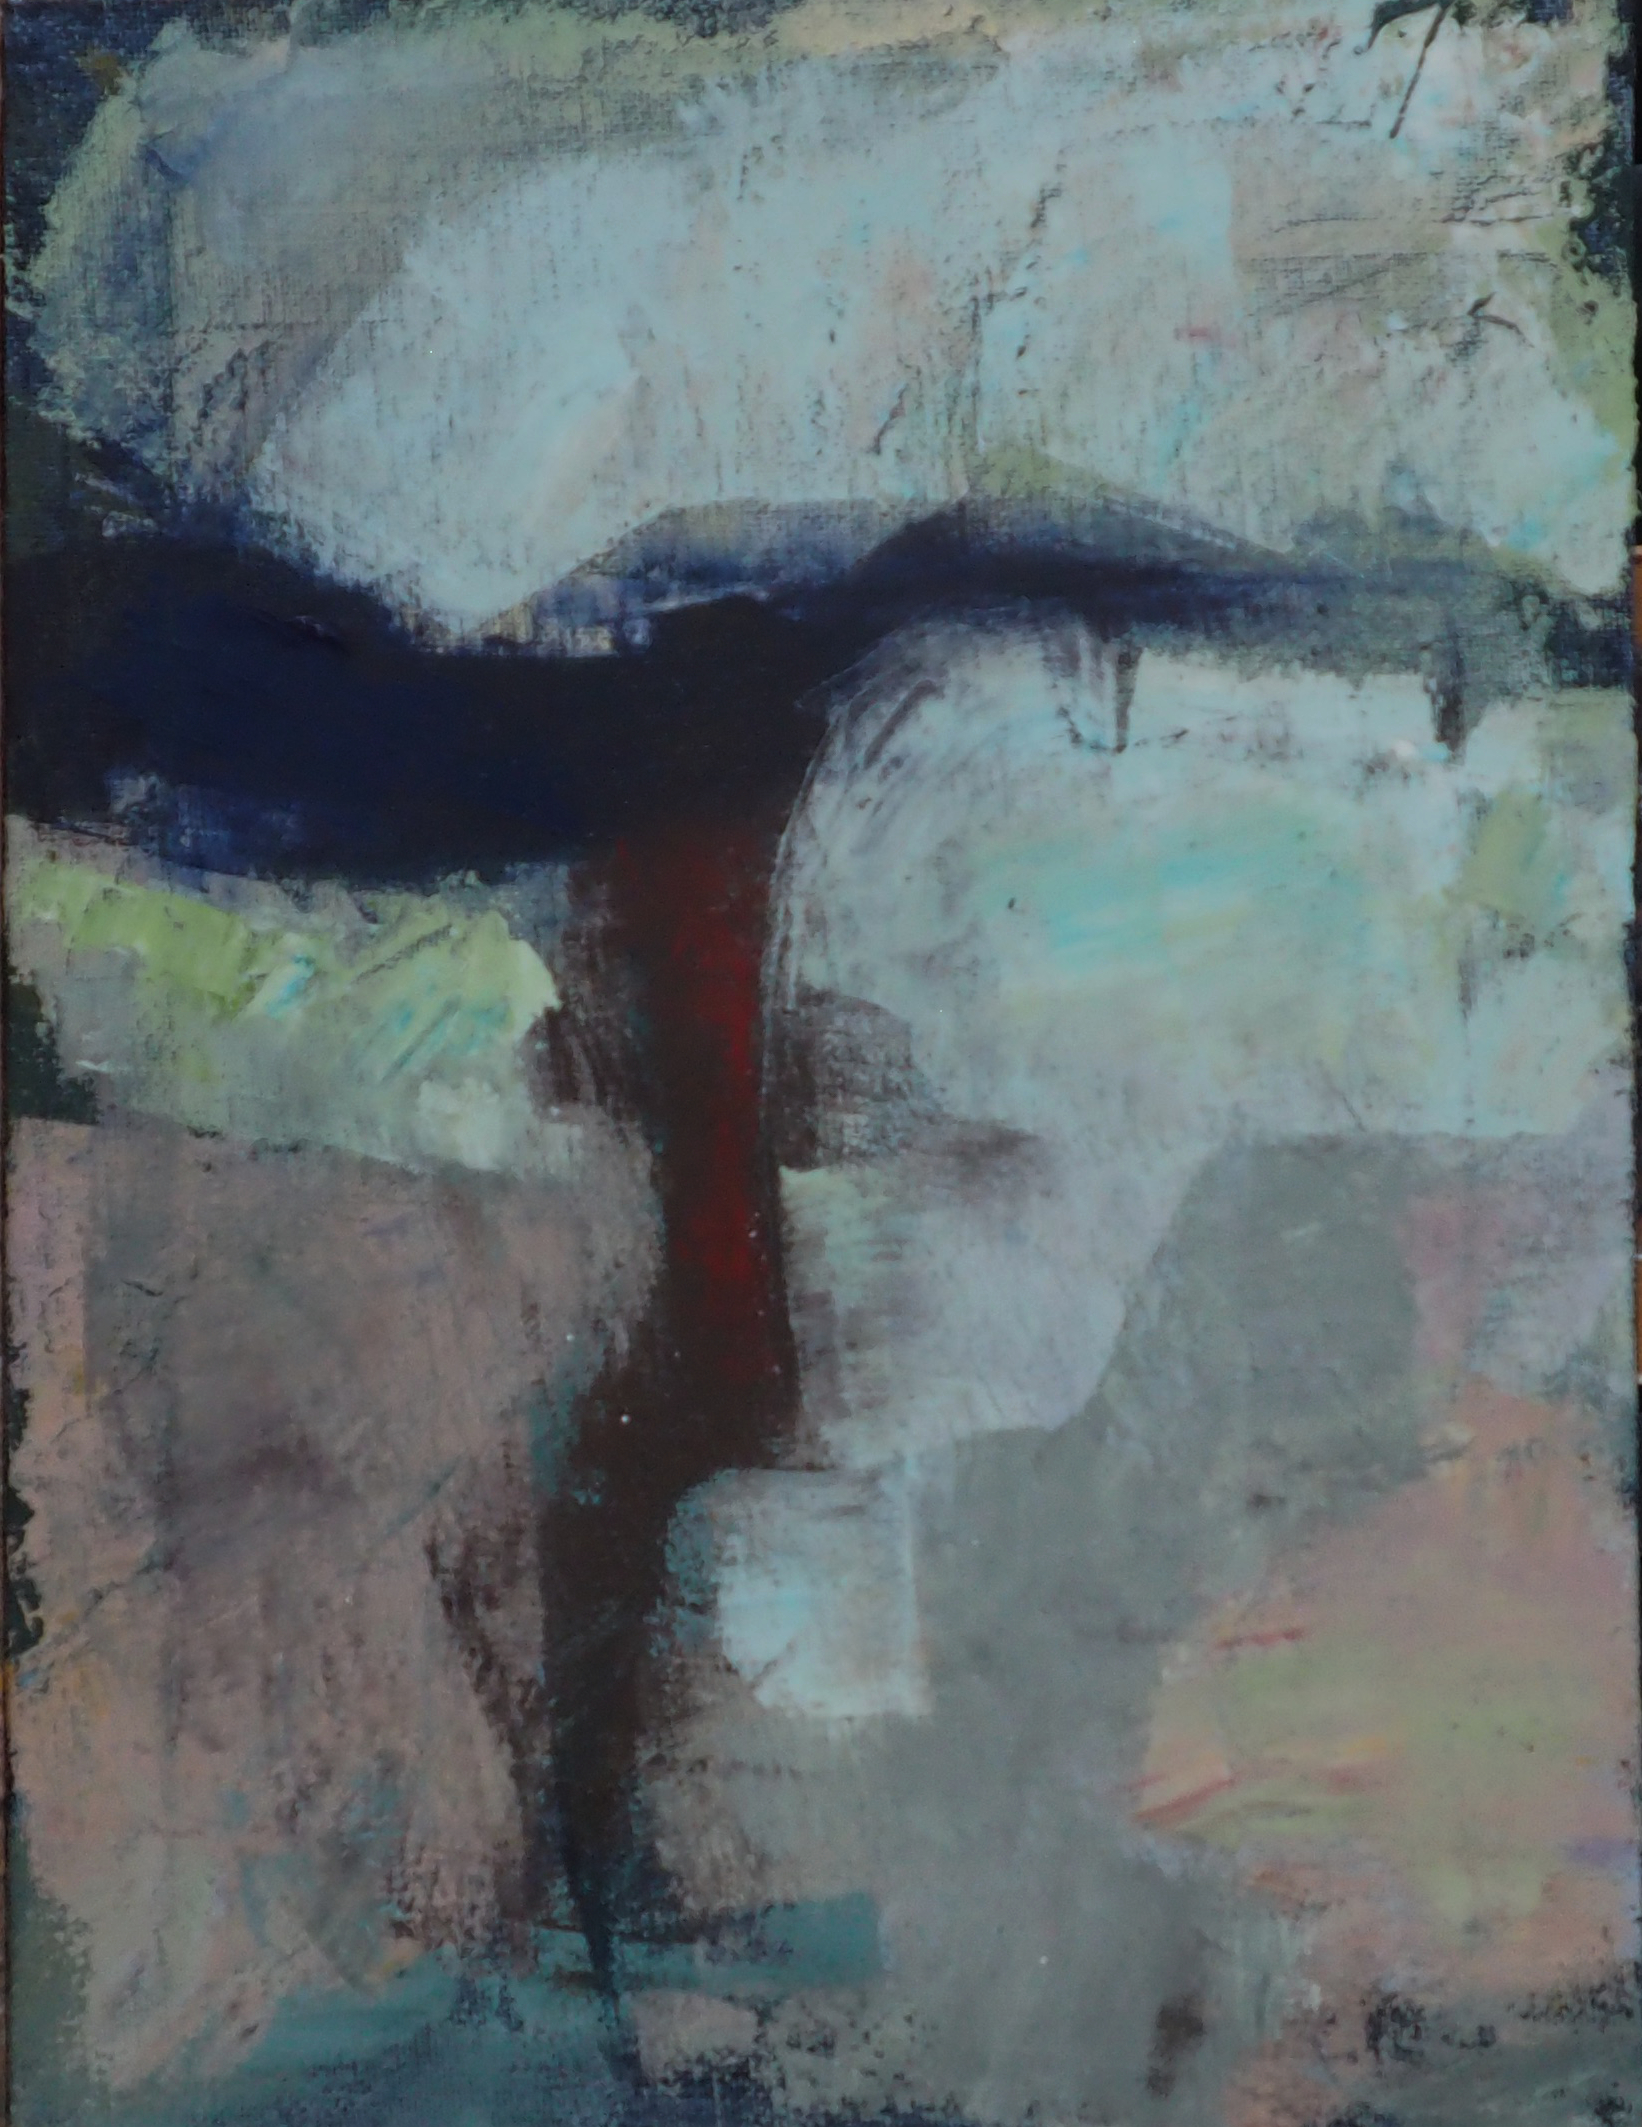
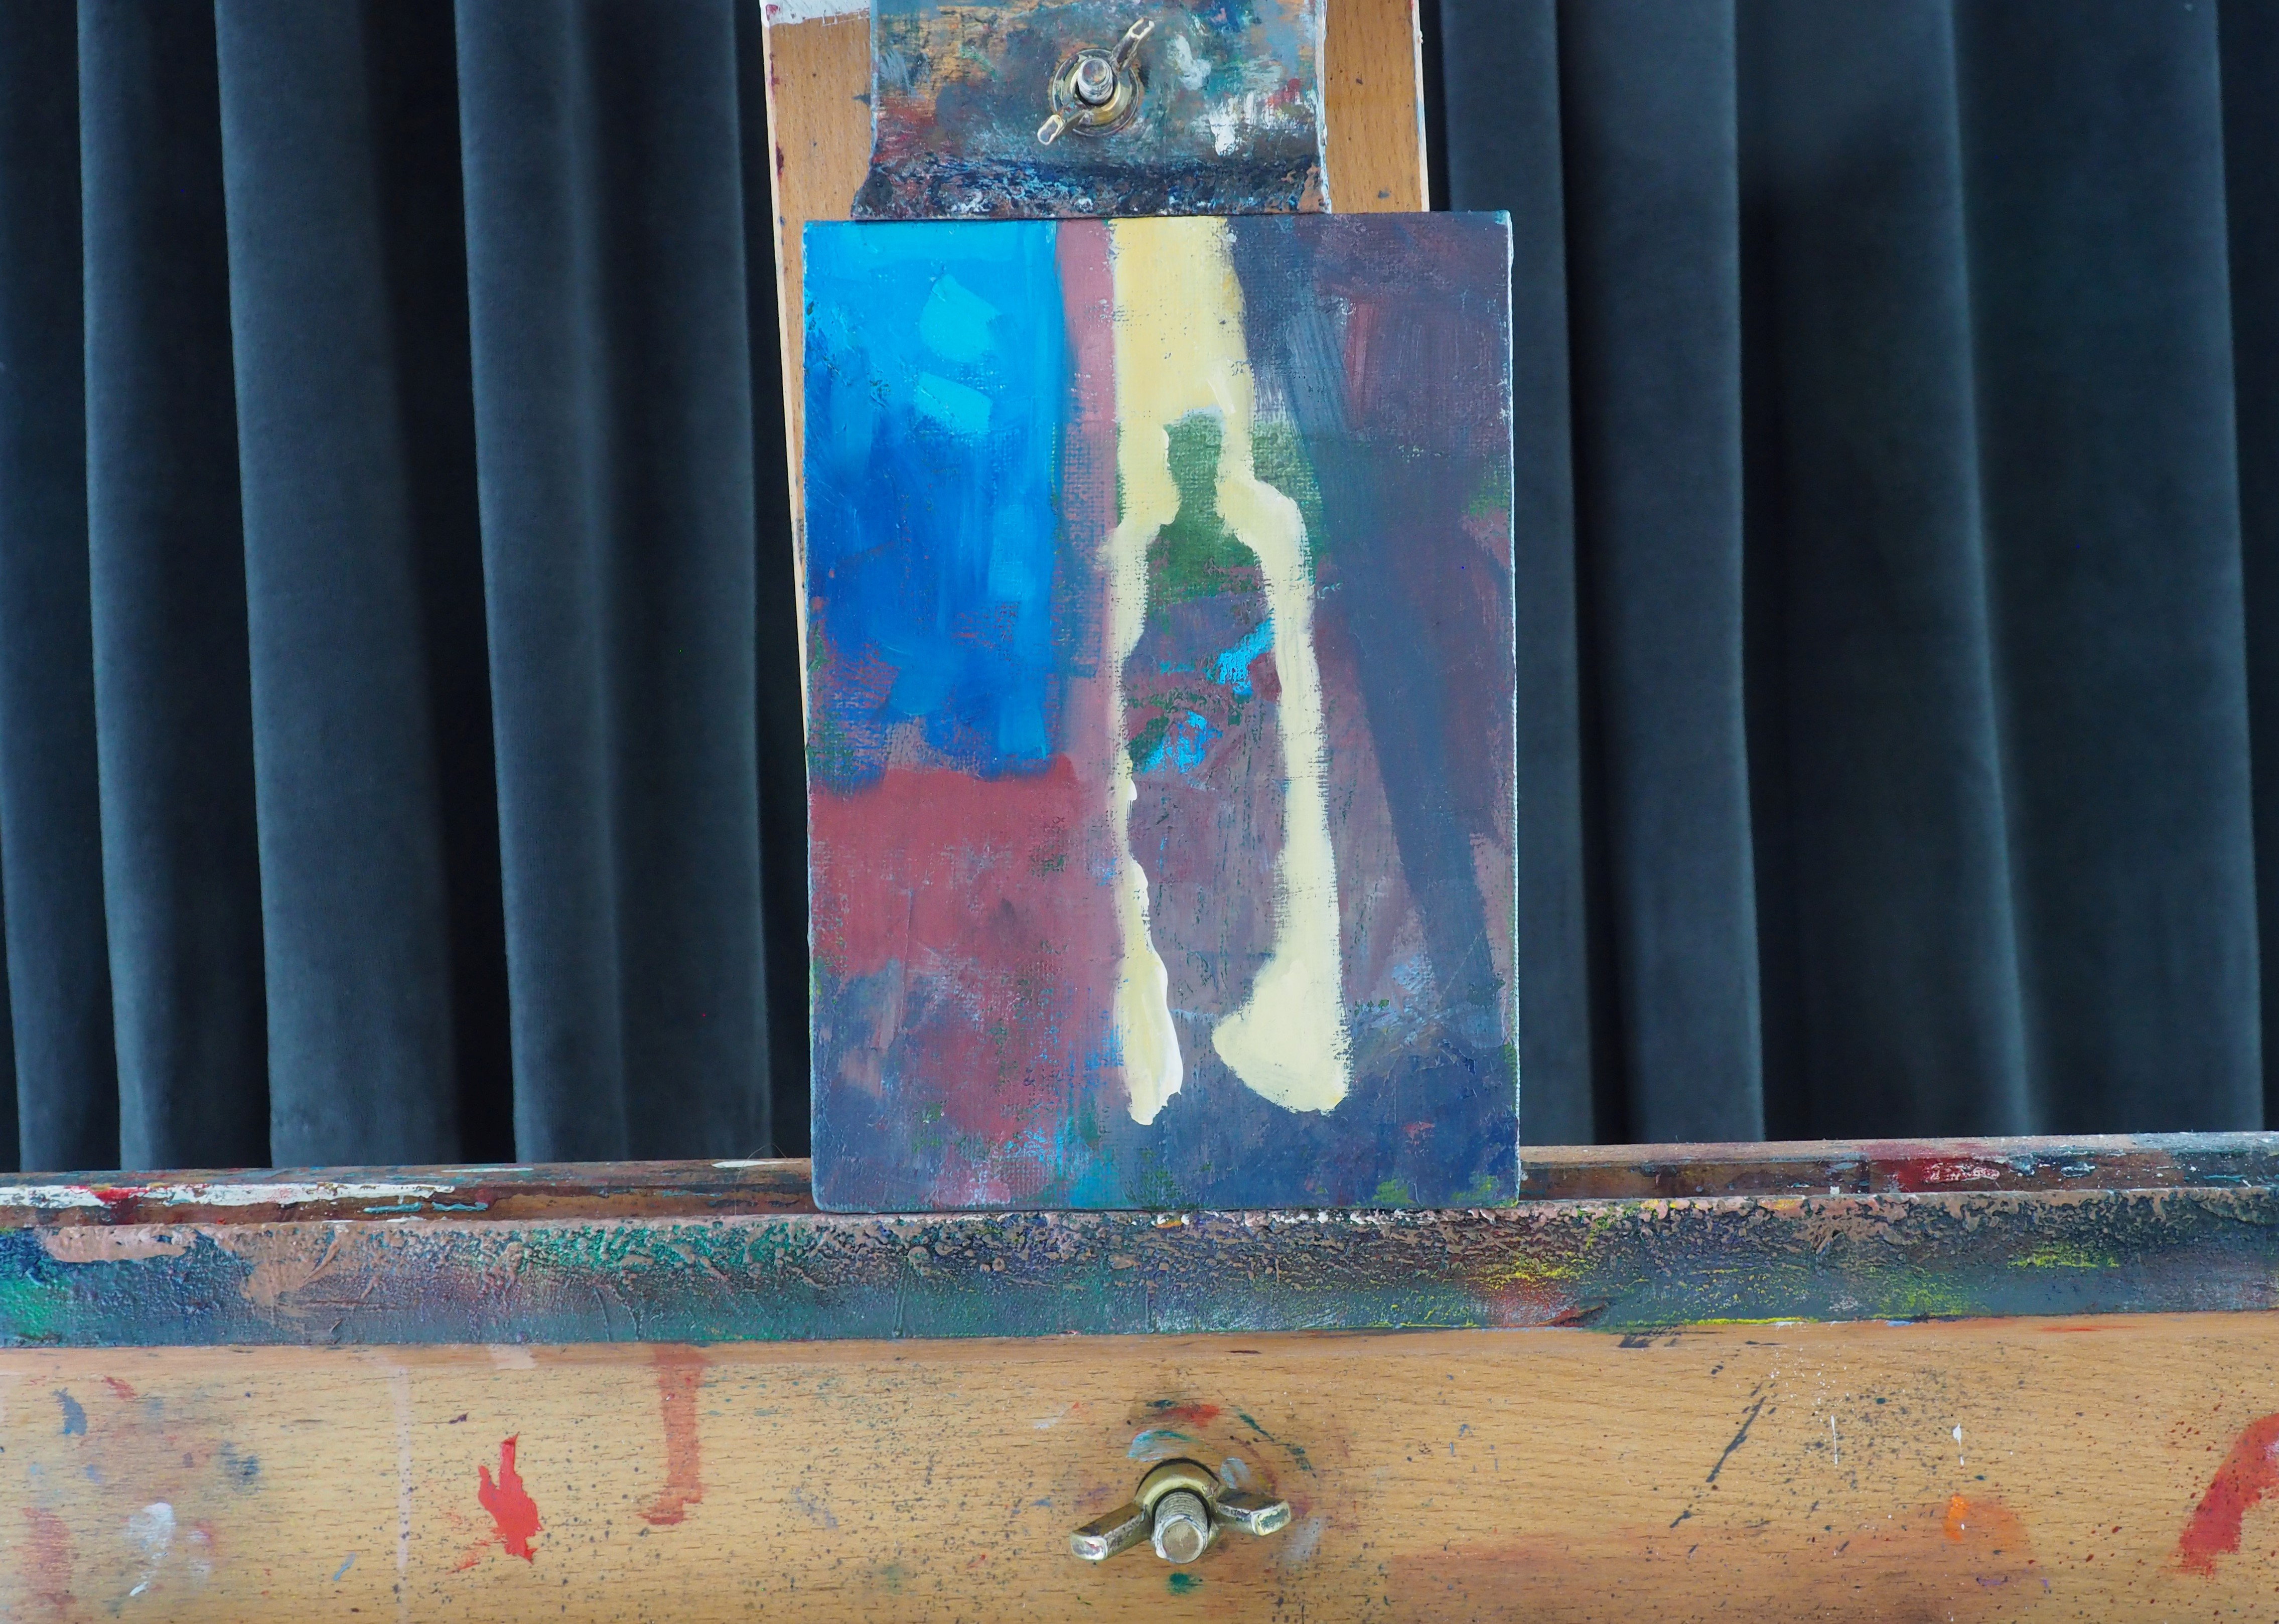
I make tiny, (6″x 6″ ish) paintings. Sometimes these are departure points for larger paintings, sometimes they’re paintings in themselves. Sometimes they’re try-outs made during the process of painting a larger work. They also provide a way of using the paint on my palette at the end of a session.
I sell these for £20.00 each.
I retired in early 2018 and decided to devote as much time as I could to painting. In May 2019 I had my first exhibition, at the Newhampton Arts Centre, as a new member of the Wolverhampton Society of Artists. For many years I’ve painted and not exhibited or tried to sell my work and although I’m quite confident about most things, I was nervous for several days before the opening. There may be a word for ‘fear of exhibiting one’s work’, but the nearest I can find is ‘Scopophobia’, which is fear of being seen or stared at by others, and I suppose that will have to do.
I was one of nineteen people exhibiting, so I wasn’t alone and what I expected was that my work would draw very few comments if any. In the event, I needn’t have worried. I got a lot of positive comments and even sold a couple of paintings, one during the exhibition and one immediately following it.
Exhibiting one’s work is a good motivator. It provides focus and generates the discipline to get work done to good standard and finished to a degree that I probably wouldn’t achieve otherwise. And of course there’s the opportunity to sell paintings…..
I was subsequently involved in setting up a Residents’ Exhibition, the work of artists with studios in the centre. As a non-resident, my work wasn’t in the exhibition, but it gave my valuable experience and enabled me to meet and get to know more local artists and see their work.
Being a part of the team organising exhibitions even in a small way helps me in a number of ways: I meet other artists and people involved locally with the arts and get to hear news of local events and become involved with them at an earlier stage.
